G4- Phoenix Graphics Install and Test: with Video
With a style for everyone, the new Phoenix is the look for us.
When looking for a set of graphics to finish off our KFX450R Motocross project, it seemed all we could find were energy drink graphics, or ones that feature hellish images of some zombie apocalypse. We were just about to throw in the towel on custom graphics for the Kawasaki and rock the stock stickers, when we came across G4’s new Phoenix style graphics. At first glance, we were sure this kit would flow beautifully with the lines of the Kawasaki.
The Phoenix, as well as G4’s other styles, is available in both body graphics and number plate background kits. Their graphics are printed on thick 16 mil vinyl.The graphics’ clear outer coating features a hardcoat over laminate to resist abrasion and has a UV protectant to help resist fading.
You can customize the look of any of G4’s standard kits by picking from a ton of custom colors. If you want your team or sponsor’s logo designed into the graphics, no problem. G4 can also create a totally custom graphic design, or logo, if needed.
Installation
Before you can add new graphics, you first need to take off the old ones. We have found a hair dryer to be helpful in heating up old glue and adding some pliability to aged graphics. This helps you peel them off more easily with less ripping.
 The most important part of making your graphics last is making sure that you remove any oil or other contaminates from the surface of the plastic prior to installation. We have heard of people cleaning their plastic with contact cleaner, alcohol, or plain old water with Dawn dish soap as we used. Be warned; some items will ruin the finish of your plastic. After thoroughly washing and wiping the entire surface of our machine’s plastic, we needed to make sure we did not transfer any oil from our fingers onto the graphics, or back onto the plastic. We washed our hands before touching the graphics, and kept a slightly soapy, wet rag around to occasionally wipe our hands. You could also wear a pair of thin rubber gloves; just make sure they don’t have any baby powder or other residue on them.
We started our installation at the front of the machine and worked our way back, installing the number plates last. Using a bottle of water with a few drops of dish soap to spray down the machine makes removing and repositioning a section of graphic easy. As long as you keep the plastic or backside of the graphic wet and contaminate free, you can do this repeatedly without damaging the graphic’s adhesive. On the tank and shroud graphics, try and place the graphic so that edges are tucked under the rim of the seat a bit so your knees don’t start snagging and peeling the graphic back.
 After getting a section in place, squeegee the water and air bubbles out with a credit card or other object with a hard, dull edge, working from the inside of each section to the outer edge. Applying graphics to sections of plastic with abrupt curves or corners can be difficult. Using a hair dryer to heat the graphic will help make it more pliable, which will help you obtain a flat, smooth install more easily. Once the graphics are installed, you may find some small remaining air bubbles. Just take a needle to poke a tiny hole in the graphic and work the air out.
Follow these steps and your graphics should stay in place and looking good for a long time to come.
The Test
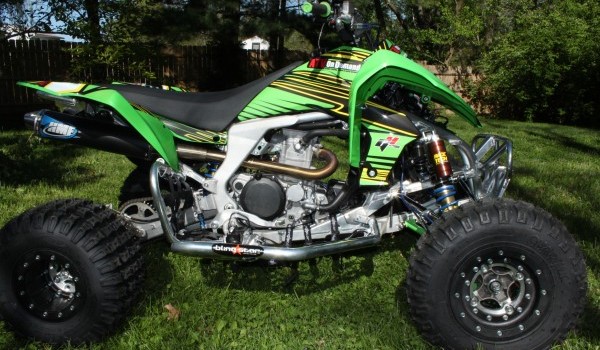
Picking graphics was the hardest part of our KFX project. Our machine is a real head turner with the graphics’ bright Kawasaki green background and neon yellow lines accented in black. The Phoenix’ feather-like graphics flow with the shape of the machine’s body, creating the appearance of forward motion even when it is sitting still. The clean linear design looks equally stunning with or without the addition of accompanying sponsor logos, which it does an excellent job of displaying.

When looking for a set of graphics to finish off our KFX450R Motocross project, it seemed all we could find were energy drink graphics, or ones that feature hellish images of some zombie apocalypse.
One thing that sucks about letting racers ride your sport quads is that they tend to destroy the machine’s finish by grinding away at it with their legs. Test riders Chase Cunningham and Dave Trimble each put a couple of races worth of seat time on our KFX450R after which our graphics look nearly good as new. G4’s vinyl is tough and its surface holds up well to wear and tear.

G4’s graphics are printed on thick 16 mil vinyl. The graphics’ clear outer coating features a hardcoat over laminate to resist abrasion and has a UV protectant to help resist fading.
Conclusion
 We love the look of G4’s new Phoenix design. Pick out the right color combo for your machine and it will get you noticed. It sure worked for our KFX.Whether you like clean and racy or dark and grungy, G4 has styles for nearly every taste.G4’s quality is very good and their pricing is competitive. This is our second time using G4’s graphics and we will definitely choose them again for projects in the future. If you want your machine to get checked out more often at the track, trail, or dunes, you should check out G4’s line of graphics.
Manufacturer: G4
Products:
G4 Phoenix Graphics $109
G4 Phoenix Custim Number Plates $79.95
G4 Phoenix KFX450R Grapics
Summary: We love the look of G4’s new Phoenix design. Pick out the right color combo for your machine and it will get you noticed. It sure worked for our KFX.Whether you like clean and racy or dark and grungy, G4 has styles for nearly every taste.
5
3 Month Test
Related Posts

HMF Can-Am Outlander 1000R Titan QS Exhaust and Fuel Optimizer Test Review →
Polaris Unveils 2022 Scrambler XP 1000 S and Ultimate Trail 570 Models: First Look →

Hannah Hunter’s 2020 WXC Pro GNCC Championship Honda TRX450R Review and What’s New for 2021 →